Schedules
Manage Schedules as an Administrator
Create services, build rosters, review volunteer requests, use the Intelligent Scheduler, and manage church-wide scheduling settings.
This guide is for church administrators and security leaders who create services, build coverage, and manage scheduling settings. The controls you see depend on your role permissions and campus access.
Before you begin
Administrators and other authorized leaders need the appropriate Schedules permissions. Create Schedules allows a leader to add services and assignments. Edit Schedules allows a leader to change assignments. Either permission allows review of pending volunteer requests. Intelligent Scheduler access requires Create Schedules or Edit Schedules.
Church-specific role overrides may differ from the default permissions. If a control is missing, review the user's role and permissions in Church Admin.
Set up regularly scheduled services
- Open Church Admin.
- Open Campus and select the campus you want to configure.
- In Service Times, select Add Service.
- Enter the service name, recurring day, start time, end time, and default team count.
- Save the service time.
Repeat these steps for each regular service and each campus. Saved service times automatically supply the recurring service cards your leaders use to build weekly schedules and coverage.
Navigate the schedule
- Open Schedules from the main navigation.
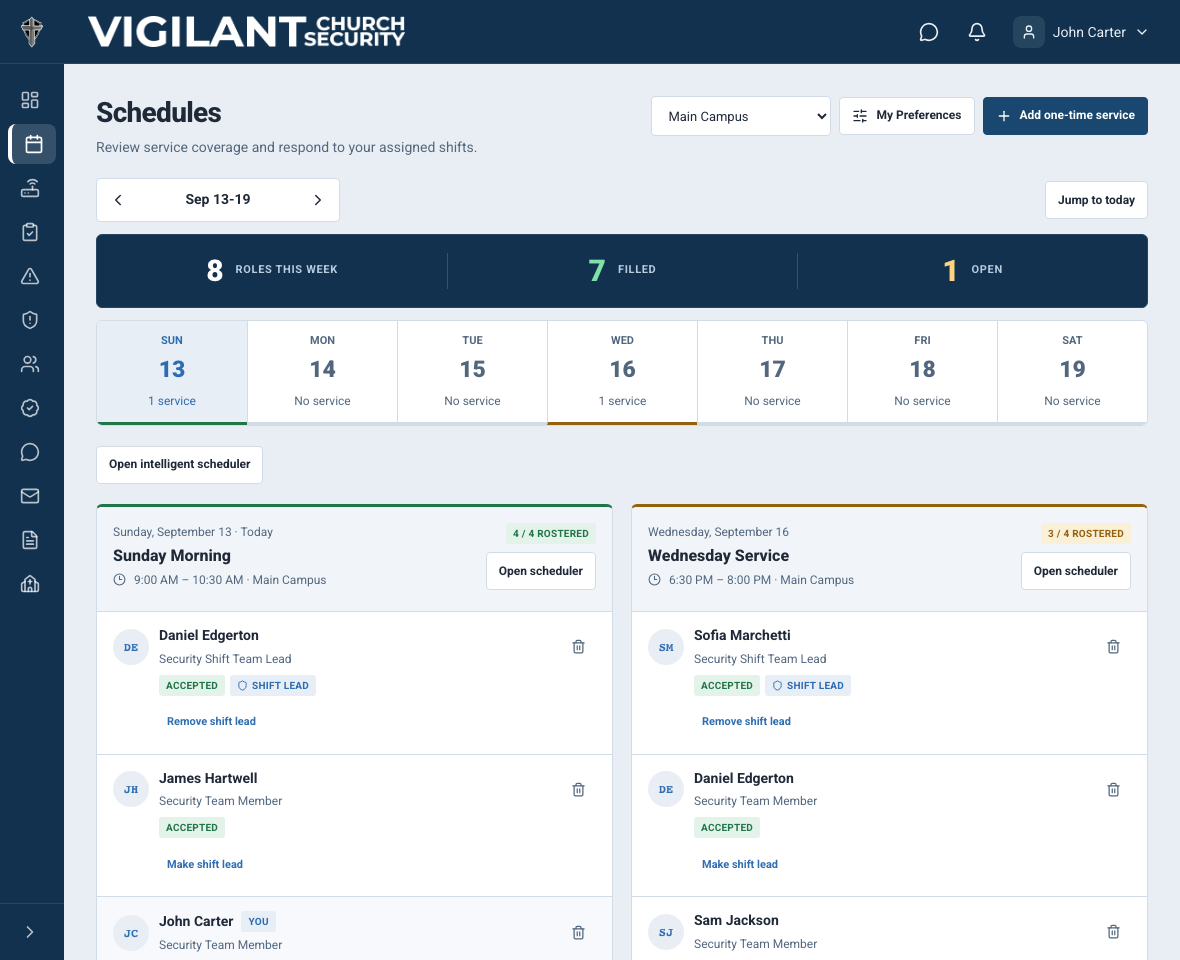
- Use the previous, current, and next week controls to move between date ranges. Use Jump to today to return to the current date.
- If you manage more than one campus, select a specific campus before editing rosters or opening Intelligent Scheduler.
A service card can show the date and time, campus, assigned people, response status, shift lead and staffing target. If the source has not supplied a target or open-slot count, treat it as unknown rather than as zero or full coverage.

Example shown with fictional demo data. View full-size screenshot.
Add a one-time service
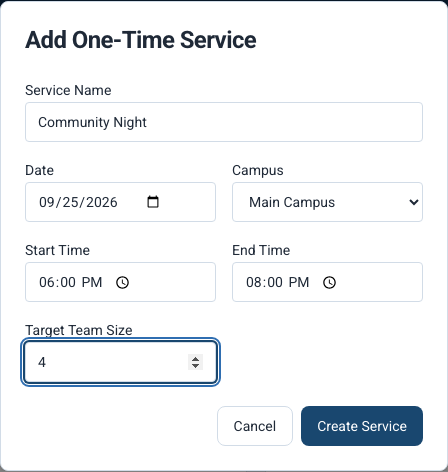
One-time services are available for campuses managed directly in Vigilant Church Security.
- Select Add One-Time Service.
- Enter a service name and date.
- Select a campus when more than one campus is available.
- Enter the start time, end time, and target team size.
- Select Create Service.
A target team size is a coverage goal, not a hard maximum. Authorized leaders can add another team member after the target is met.

Example shown with fictional demo data. View full-size screenshot.
Assign team members and a shift lead
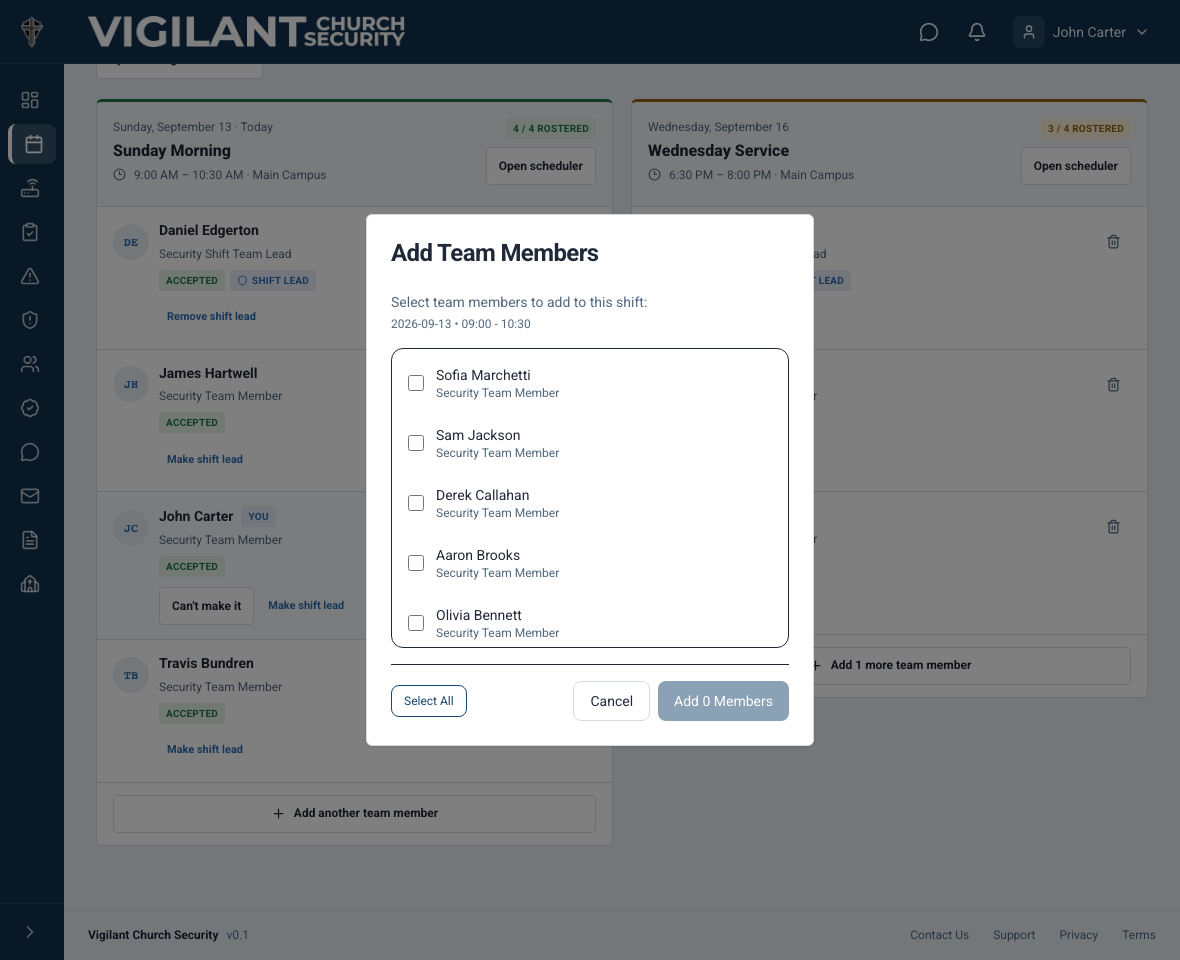
- On a service card, select Add team, Add more, or Add another team member.
- Select one or more eligible team members. The list excludes people already assigned to that service and people who blocked out that date.
- Confirm the selection to add the assignments.
- When needed, use the shift-lead control beside an assigned person to designate or remove the shift lead.
Assignments begin with a pending response until the team member accepts or declines. Leaders can monitor each response directly on the service card.

Example shown with fictional demo data. View full-size screenshot.
Review volunteer requests
A team member's volunteer action sends a request; it does not immediately add the person to the roster.
- Open the week and campus that contains the requested service.
- Find Pending volunteer requests on the matching service card.
- Review the requester's name and role, then select Approve or Decline.
Approving adds the person to the service and records the assignment as accepted. Declining closes the request without adding an assignment. A request cannot be approved if the person is already assigned or if the campus uses one-way Planning Center scheduling.
Use Intelligent Scheduler
In web versions with the inline editor, Intelligent Scheduler stays closed until you open it. Returning to Schedules starts with the normal service cards. Select one campus and the intended week before opening the scheduler.
- Select Open intelligent scheduler and choose the service you want to staff.
- Use Recommended to review ranked candidates, or All members A–Z to browse eligible people alphabetically.
- Candidates initially come from the selected campus through their home campus or explicit membership. Select Include other campuses only when you intend to consider eligible people elsewhere in the same church. Existing cross-campus assignments remain visible when the option is off.
- Add a candidate to an open roster slot, or remove an assignment using its control. Review any lead requirement; required leads count within the total team size.
- Use Auto-fill open slots when you want suggested people placed in the remaining slots. Review the resulting roster and wait for the save result.
- Use Undo for the most recent roster change when available. Refresh and review if another leader changed the same roster or a save fails.
- When coverage is ready, select Publish & notify team. Wait for Team notified. A later roster change requires publication again to notify the updated roster.
Auto-fill and assignment saves do not mean the team has been notified. Publish only after reviewing the service and people. Closing the scheduler collapses the editor; it does not disable scheduling or erase saved assignments.
Recommendations consider campus fit, serving preferences and recent load. They are suggestions, not confirmed availability. Block-out dates, opt-outs and overlapping services affect eligibility. Review each person's response after assignment.
One-way Planning Center campuses remain read-only. Two-way campuses use supported Planning Center write-through actions. If the installed web version shows an older scheduler or a control is missing, follow the available service-card workflow and ask Support about access or availability.
Understand team member preferences
Team members can use My Preferences to choose a preferred weekend and serving cadence, opt in or out of scheduler suggestions, indicate willingness to serve extra when coverage is thin, and add block-out dates.
Turning off Opt in to scheduler suggestions tells Intelligent Scheduler to avoid suggesting that person by default. It is not the church-wide scheduling switch. Block-out dates are the stronger control for dates when a person cannot serve.
Planning Center behavior
- Native campus: services and assignments are managed in Vigilant Church Security.
- Two-way Planning Center campus: assignments made in Vigilant can sync back as unconfirmed, and schedule responses can be synchronized.
- One-way Planning Center campus: Vigilant displays schedules and recommendations as read-only. Complete assignments and responses in Planning Center.
Disable scheduling for the entire church
Use this option only when the church no longer wants to use scheduling. It affects much more than the Intelligent Scheduler panel.
- Open Church Admin, then Scheduling Options.
- Turn Scheduling to Disabled.
- Select Save Changes.
Disabling Scheduling removes schedule pages, schedule navigation, dashboard check-in cards, attendance reporting, mobile schedule tabs, offline schedule actions, and Planning Center scheduling for the church.
Important: saving with Scheduling off disconnects the church's Planning Center scheduling setup. Turning Scheduling back on later does not restore Planning Center credentials or campus mappings. The connection must be configured again.
Troubleshooting
- No Add One-Time Service button: confirm Create Schedules permission and verify that the selected campus is not managed by Planning Center.
- No Intelligent Scheduler button: confirm Create Schedules or Edit Schedules permission.
- No scheduler recommendations: select one campus and a week that contains services.
- Assignment is blocked: the person may have a block-out date, already be assigned, be outside the campus scope, or be excluded from scheduling.
- Schedules redirects to Dashboard: church-wide Scheduling may be disabled.
Scheduling access and mobile controls
Church-wide Scheduling Options has its own authorization check; being allowed to edit an assignment does not necessarily permit disabling scheduling. Pastoral & Ministry Staff may manage schedules when their church enables that capability, while remaining excluded from security-service assignment and volunteering. Separate Church Admin access does not change that operational eligibility.
Use the web app for Intelligent Scheduler, publishing and administration controls missing from your installed iPhone or Android build. After a failed assignment or approval, reopen the service and review the saved state before repeating it.