Equipment
Use, Check Out, and Return Equipment
Learn how team members find available equipment, record a checkout, return items, and report damaged or lost gear.
The Equipment section helps security team members find available gear, check it out before a shift or event, and record its return. Accurate checkouts tell other team members what is available and give leaders a reliable history for radios, keys, first-aid resources, safety gear, and other shared equipment.
Only check out equipment you are authorized and trained to use. Follow your church’s handling, key-control, medical-equipment, and radio procedures at all times.
Understand the Equipment workspace
Select Equipment in the main navigation. If a campus selector is available, choose the campus where you are serving. Equipment assigned to All Campuses may also appear in a campus view.
The top of the page summarizes available, checked-out, and maintenance equipment, displays the selected campus radio channel, and counts overdue checkouts. Equipment is organized into Radios & Communication; Flashlights, Keys & First Aid; and Everything Else.
Each equipment card shows its name, category, campus, status, available quantity, total quantity, and current holders. Select the card to view its active checkouts and checkout history.
Check out equipment
- Find the equipment you need and confirm that the card shows at least one unit available.
- Select Check Out. Equipment marked Maintenance or Retired cannot be checked out.
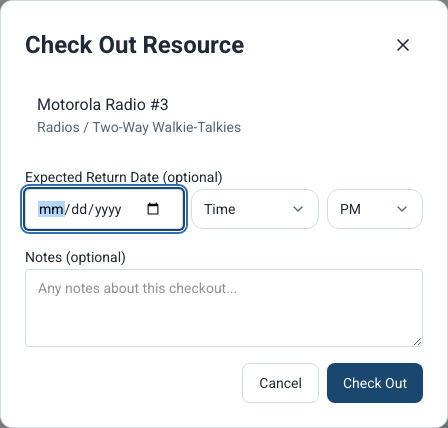
- If you know when the item should be returned, choose an Expected Return Date, Time, and AM or PM. The return date is optional, but the form requires both the date and time when either one is entered.
- Add optional Notes when a leader needs context, such as the service, event, post, vehicle, or temporary assignment connected to the checkout.
- Select Check Out to confirm. The available count decreases by one, and your name appears as a current holder.
If all units were checked out before your request completed, the application will tell you that no units remain. Refresh the Equipment page or speak with a security leader rather than checking out a different record that does not match the item.

Example shown with fictional demo data. View full-size screenshot.
Use and safeguard checked-out equipment
- Inspect the item before use and report existing damage or missing parts to a security leader.
- Keep radios, keys, access cards, badges, and medical equipment under your control. Do not transfer them without following your church’s handoff procedure.
- Use the equipment only for its approved church safety or security purpose.
- Return equipment by the expected time or immediately after the assignment ends.
- Notify a leader promptly if equipment is damaged, lost, stolen, or unsafe to use.
Check equipment back in
- Find the equipment card and select Check In. The action is available when the record has at least one active checkout.
- If more than one unit is checked out, use Return Which Checkout to select the correct holder and checkout time. Your own active checkout is selected first when available.
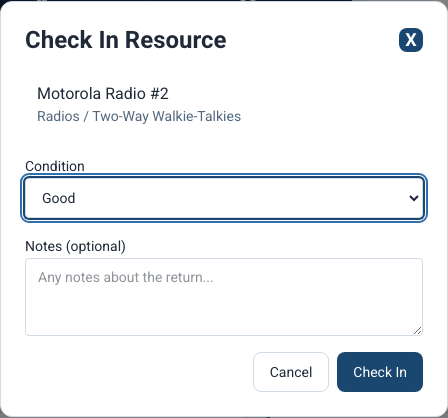
- Choose the return Condition: Good, Damaged, or Lost.
- Add Notes for damage, missing accessories, battery problems, where a lost item was last seen, or another fact a leader needs for follow-up.
- Select Check In. The return time, condition, and notes are added to the equipment’s checkout history.
Marking an item Damaged or Lost records the return condition, but an administrator may still need to change the equipment record to Maintenance or Retired. Contact a leader directly when the item should not be issued again.

Example shown with fictional demo data. View full-size screenshot.
Review equipment details and history
Select an equipment card to see its description, total and available quantities, current holders, and checkout history. History can include who held the item, who assigned it, checkout and return dates, expected return date, condition, and notes.
Use this information to confirm that you selected the correct shared resource and that your return was recorded. If the history is incorrect, contact a security leader instead of creating another checkout to compensate.
Understand overdue equipment
A checkout is counted as overdue when its expected return time has passed or when it has remained active for more than nine hours. The Overdue summary groups these records as Radios & Communication; Lights, Keys, & First Aid; or Everything Else.
Return overdue equipment as soon as possible and notify the appropriate leader if you cannot. Completing the Check In action is required; physically placing an item back in storage does not update the inventory.
If an Equipment action is unavailable
- If the Equipment section does not load, ask an administrator to confirm that your role has View Equipment.
- If Check Out is unavailable or rejected, ask an administrator to check checkout access. If Check In is unavailable, ask them to check effective check-in access separately. Viewing equipment or having checkout access alone is not proof that a return is authorized.
- Check Out is hidden when no units are available or the equipment is marked Maintenance or Retired.
- Check In is shown only when the equipment has an active checkout.
- If the wrong campus is selected, change the campus filter or choose All Campuses when your access allows it.
Team-member equipment habits
- Check out the exact equipment record you physically received.
- Use the expected return time and checkout notes when they will help the next shift or a leader.
- Check items in immediately after returning them to the approved storage location.
- Choose an accurate condition and write factual return notes.
- Never delete, relabel, swap, or retire equipment to resolve a checkout problem; ask an administrator to correct the inventory record.
Confirm the checkout you are returning
When a resource has several units or holders, select the active checkout that matches the physical item and recorded holder. Return another person's checkout only when the control is available and you are authorized. Wait for the successful return, then confirm the checkout ended and the available quantity changed as expected.
If the server reports a conflict or an already-returned item, refresh the record before retrying. Do not create a new checkout or change inventory quantity to work around the error. If a campus radio-channel control is available, only an authorized leader should change it; confirm the channel with the team before use.
Return equipment from your phone
On iPhone or an Android test build, open Equipment or the dashboard's checked-out equipment card. Select the item and the return action offered by your account. Verify the recorded holder and checkout before confirming a return, especially when a resource has several units. Wait for success and confirm that the checkout is no longer active. Dashboard card layout can differ between versions; the saved equipment record is the place to check an uncertain result.