Equipment
Manage Church Equipment as an Administrator
Add, organize, edit, monitor, retire, and remove church security equipment while preserving a reliable checkout history.
The Equipment section is the shared inventory and checkout record for church security resources. Administrators and security leaders use it to add equipment, assign it to a campus, track quantities and current holders, monitor overdue returns, record maintenance needs, and preserve checkout history.
The application uses the word Resource in some equipment forms and dialogs. In this guide, equipment and resource refer to the same inventory record.
Review the Equipment overview
Select Equipment in the main navigation. If your church has more than one campus, use the campus selector to view one campus or All Campuses. Equipment assigned to All Campuses is available when viewing an individual campus as well.
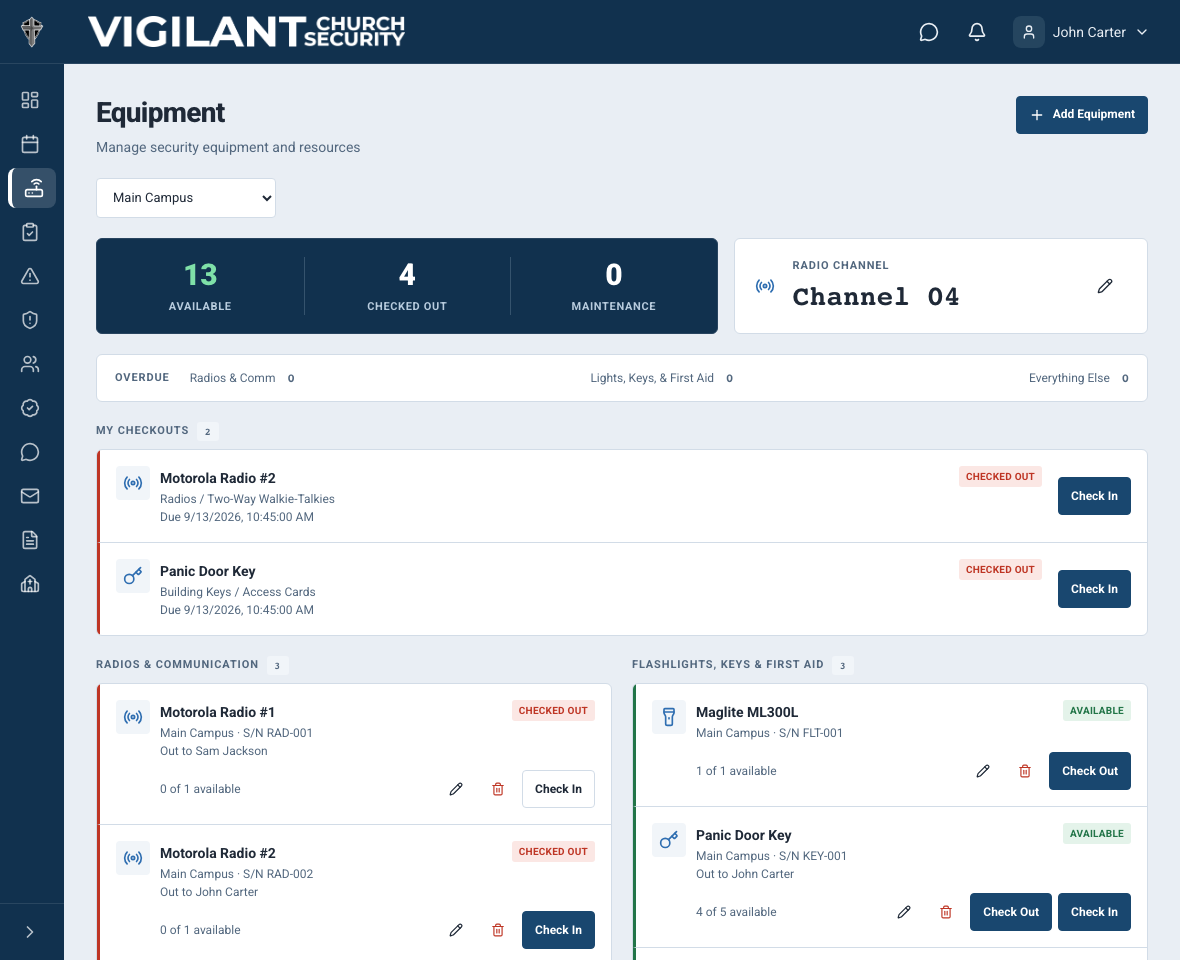
The Resources summary totals available units, checked-out units, and records marked Maintenance. Radio Channel displays the channel configured for the selected campus. Overdue groups active checkouts into Radios & Communication, Lights, Keys, & First Aid, and Everything Else.
Equipment cards show the name, category, campus, serial number when present, status, total quantity, available count, and current holders. Select a card to see active checkouts and checkout history.

Example shown with fictional demo data. View full-size screenshot.
Configure Equipment permissions
Open Church Admin, then Role Permissions, and review the Equipment permission group. A church can change role permissions, so confirm the effective access for your organization.
- View Equipment — allows a person to see the equipment list and active checkout information.
- Add Equipment — allows creation of a new equipment record.
- Edit Equipment — allows changes to equipment details, quantity, campus, and status.
- Delete Equipment — allows removal of equipment that has no checkout history.
- Checkout Equipment allows issuing equipment. Check In Equipment is a separate permission for returning authorized active checkouts.
Review the separate View, Add, Edit, Delete, Checkout and Check In Equipment controls, then verify the intended action and campus. Pastoral & Ministry Staff has read-only equipment access by default; viewing does not grant checkout or return access.
Keep Add, Edit, and Delete Equipment limited to leaders responsible for inventory. Delete should be especially restricted because it removes the inventory record and is intended only for items that have never been checked out.
Plan equipment records before adding them
Decide whether one record represents a single item or a group of interchangeable units. A record with quantity 10 works well for identical, interchangeable radios. Create separate records when each item has its own serial number, maintenance history, assigned campus, or accountability requirement.
- Use a consistent name, such as Main Campus Radio or North Campus Master Key.
- Choose the category that best controls where the item appears in the Equipment workspace.
- Assign campus-specific equipment to that campus and organization-wide equipment to All Campuses.
- Record serial numbers for individually tracked items. Do not place several different serial numbers in one record.
- Use the description for identifying details, storage location, intended use, or other concise instructions.
Add equipment
- Select Equipment in the main navigation, then select Add Equipment.
- If the campus field is shown, choose the campus that owns the item. Choose All Campuses only when the equipment is genuinely shared across the organization.
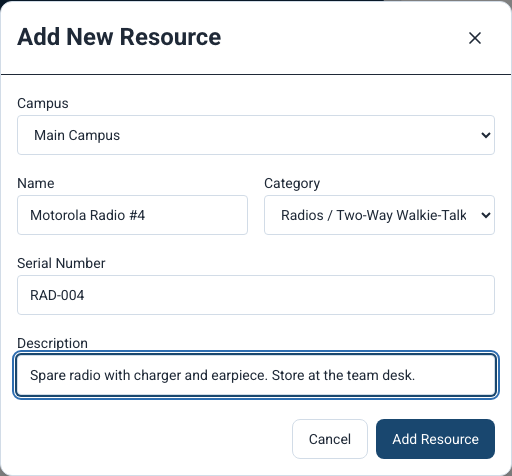
- Enter the Name. This is the only field required by the form, but completing the remaining fields makes the inventory more useful.
- Choose a Category: Badges / ID Lanyards, Building Keys / Access Cards, First Aid Kits / AED, Flashlights, Headsets / Earpieces, Lockbox, Megaphones, Other, Patrol Vehicle / Golf Cart, Pagers / Alert Systems, Radios / Two-Way Walkie-Talkies, Safety Vests / Jackets, or Surveillance Monitors / Camera Access.
- Enter the Serial Number when the record represents one serialized item.
- Add a brief Description that helps the team identify, locate, or correctly use the equipment.
- Select Add Resource. A newly added record starts with a quantity of 1 and a status of Available.
- If the record represents multiple interchangeable units, select the pencil icon, change Quantity to the correct total, and save.
The category determines the visual grouping. Radio, walkie-talkie, pager, alert-system, headset, and earpiece categories appear under Radios & Communication. Flashlight, key, first-aid, and AED categories appear under Flashlights, Keys & First Aid. All other categories appear under Everything Else.

Example shown with fictional demo data. View full-size screenshot.
Edit equipment and manage status
Select the pencil icon on an equipment card. The Edit Resource dialog allows an authorized leader to change Campus, Name, Category, Serial Number, Status, and Quantity. Select Save after reviewing the changes.
- Available — at least one unit can be checked out.
- Checked Out — all available units are currently checked out. The checkout workflow updates this status automatically as units leave and return.
- Maintenance — the equipment should not be checked out while it is being inspected or repaired.
- Retired — the equipment is no longer in service and cannot be checked out.
Use the Check Out and Check In actions rather than manually changing an item to Checked Out. When a returned item is marked Damaged or Lost, review the return notes and then change the equipment record to Maintenance or Retired when appropriate.
Before lowering Quantity, review the active checkout count. The displayed available quantity can never be less than zero, but reducing the total below the number of active checkouts creates a confusing inventory record.
Monitor checkouts and overdue equipment
Each card shows how many units are available and who currently holds checked-out units. Select the card to open details, including the full quantity, active holders, checkout date, expected return date, actual return date, condition, checkout notes, and return notes.
An active checkout becomes overdue when its expected return time has passed or when it has been checked out for more than nine hours without being returned. Use the Overdue summary to identify the affected equipment group, then open the related equipment card and contact the current holder according to church policy.
When several units share one record, the Check In dialog lets the user select which active checkout is being returned. Encourage the team to verify the holder and checkout time before completing the return.
Remove or retire equipment
Deletion is only available for an equipment record with no checkout history. This protects the accountability trail for every item that has been issued to a team member.
- Confirm that the equipment was created by mistake or has never been checked out and does not need to remain in the inventory.
- Select the trash icon on the equipment card, or open the equipment details and select Delete.
- Review the equipment name in the Delete Resource confirmation, then select Delete.
If the application reports that the resource has checkout history, it cannot be deleted. Close the confirmation, select the pencil icon, change Status to Retired, and save. Retiring prevents future checkout while preserving active-holder information and historical checkout records.
Equipment administration practices
- Review overdue equipment after each service or event and follow up with the recorded holder.
- Reconcile displayed quantities with a physical inventory on a regular schedule.
- Keep serial numbers, campus ownership, radio channels, and maintenance statuses current.
- Use return conditions and notes to decide when an item needs inspection, replacement, or retirement.
- Review Equipment permissions whenever a leader changes responsibilities or leaves the team.
- Retain checkout history according to your church’s approved safety, insurance, and records policies.
Confirm the checkout you are returning
When a resource has several units or holders, select the active checkout that matches the physical item and recorded holder. Return another person's checkout only when the control is available and you are authorized. Wait for the successful return, then confirm the checkout ended and the available quantity changed as expected.
If the server reports a conflict or an already-returned item, refresh the record before retrying. Do not create a new checkout or change inventory quantity to work around the error. If a campus radio-channel control is available, only an authorized leader should change it; confirm the channel with the team before use.