Checklists
Use and Complete Shift Checklists
Learn how team members start, complete, save, and review campus shift checklists with notes and photos.
Shift Checklists guide recurring safety and security work at your campus. Team members use them to confirm each step, record observations, attach useful photos, save progress, and create a completed record for church leaders.
A checklist supports your church’s procedures; it does not replace judgment or emergency action. If a step reveals an immediate hazard or threat, follow the church response plan and notify the appropriate leader before continuing.
Open the correct campus checklist
- Select Checklists in the main navigation.
- If the campus selector is available, choose the campus where you are serving. A specific campus is required before you can start a checklist.
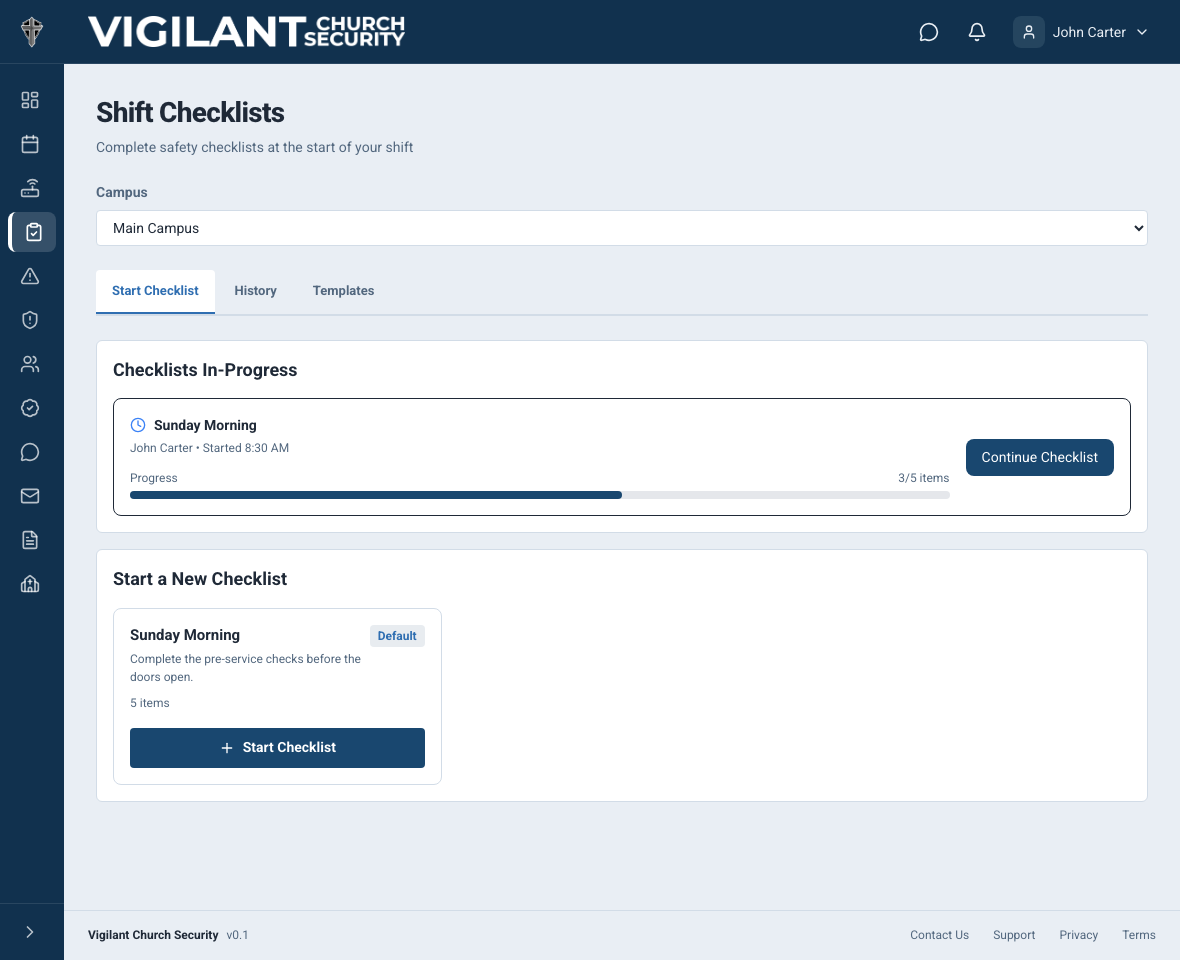
- On Start Checklist, first review Checklists In-Progress. Continue the existing campus checklist when it covers the same shift or assignment instead of creating a duplicate.
- If no appropriate draft exists, find the correct template under Start a New Checklist and select Start Checklist.
Each template card shows its name, description, item count, and a Default label when a leader marked it as the campus default. Choose the template your church procedure requires; the Default label does not replace your leader’s instructions.

Example shown with fictional demo data. View full-size screenshot.
Complete checklist items
- Read the checklist item and perform or verify the stated action.
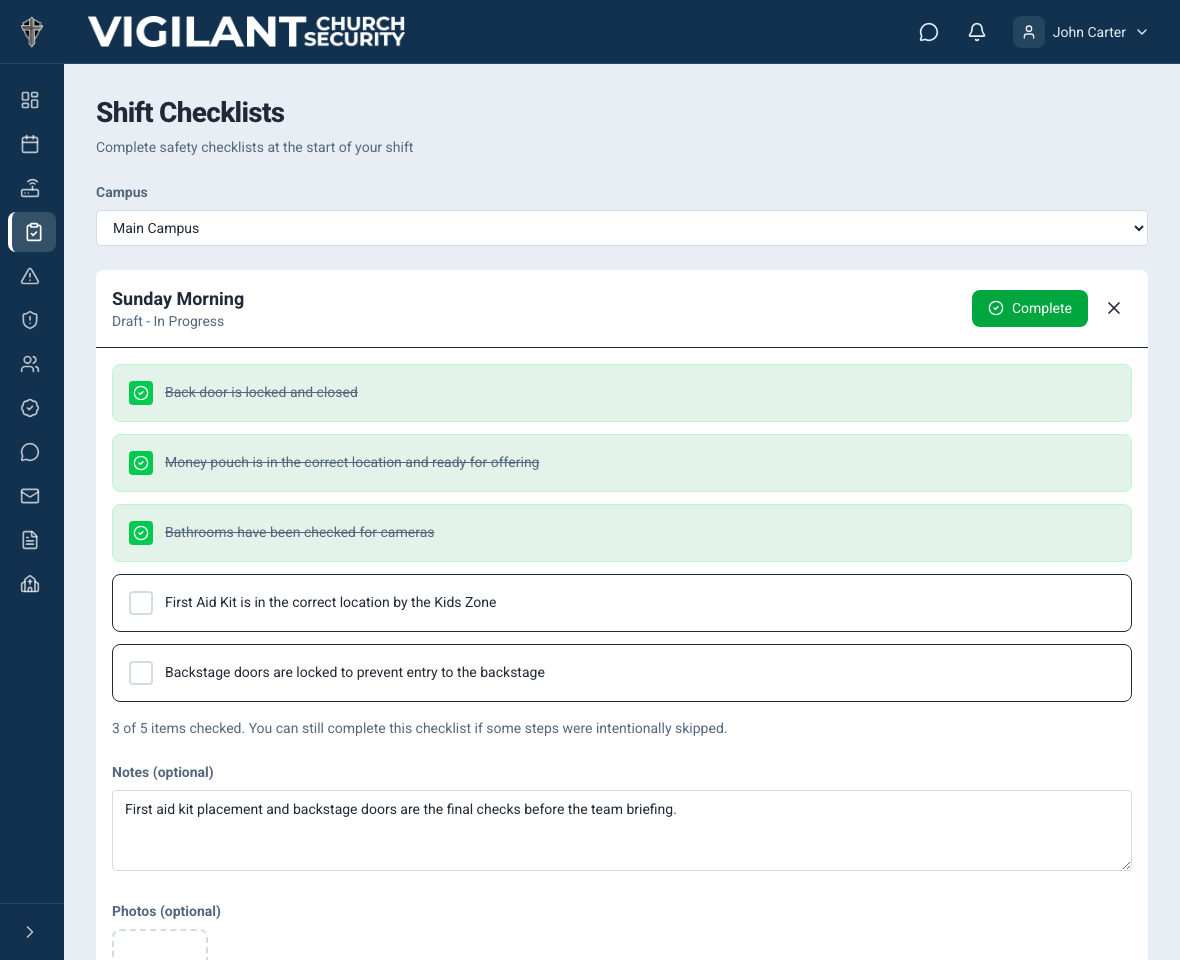
- Select the item to mark it checked. A checked item displays a green check and crossed-out text.
- Select the item again if it was checked by mistake and still needs work.
- Review the progress message showing how many items are checked out of the total.
Only mark an item checked when you personally performed or verified it, or when your church’s handoff procedure authorizes you to record another person’s verification. Do not check items simply to make the checklist appear complete.

Example shown with fictional demo data. View full-size screenshot.
Add notes and photos
Use Notes for an observation, skipped step, repair request, handoff detail, or other information a leader needs. Write objective facts and identify any action already taken.
Use Photos when an image will help document a condition or completed task. Select the camera area and choose an image. Uploaded files must be images no larger than 10 MB. Open a thumbnail to view it at full size.
- Do not photograph people, private records, access credentials, keys, medical information, or security-sensitive details unless church policy specifically requires it.
- Never enter an unsafe area or delay an emergency response to take a photo.
- While the checklist is still a draft, remove an incorrect photo using its trash control when available.
Save and continue a draft
On the web, item progress saves as you mark items; notes save when you leave the Notes field, and the open draft periodically autosaves. On iPhone, follow the saved, pending or error state and wait for the latest change to save. In current Android test builds, notes stay local while you type: select Save Draft or Complete to save them. Pausing, leaving the notes field or closing the editor does not save Android notes. Checkbox and photo actions have their own save behavior. Reopen the run to confirm an uncertain save before handing it off.
A same-day draft appears under Checklists In-Progress for the campus. Select Continue Checklist to resume it. Drafts are campus-wide, so another authorized team member may continue operational work when your church’s handoff process requires it.
If you hand the checklist to another team member, communicate which steps you completed, which remain open, and any notes or photos that need attention.
Complete the checklist
- Review every item, including unchecked steps.
- Add a note explaining any item that was intentionally skipped, not applicable, blocked, or failed.
- Confirm that the notes and photos do not contain unnecessary sensitive information.
- Select Complete. The checklist moves from Draft - In Progress to Completed and is added to campus history.
The application allows completion with unchecked items so legitimate exceptions can be recorded. Do not use that flexibility to ignore required work. Completed checklist item results and notes are final and cannot be edited through the normal workflow.
Review checklist history
Open History to see campus checklist runs. A green check marks a completed checklist and a clock marks a draft. Each entry identifies the template, team member, date, status, and item progress.
Select an entry to review its items, notes, and photos. Use History to confirm that your work was recorded or to understand the previous shift’s checklist. Do not change another person’s draft unless your church’s handoff process authorizes it.
If a checklist action is unavailable
- If Checklists does not load, ask an administrator to confirm that your role has View Checklists.
- If no templates appear, confirm the selected campus and ask the Campus Security Lead whether a template has been created.
- If Start Checklist is unavailable, select a specific campus instead of All Campuses.
- If a completed checklist cannot be changed, create no replacement or duplicate; contact a security leader to document the correction according to church policy.
- Team members normally do not have Delete Checklists. Ask an authorized administrator, director, or assigned campus lead to remove an accidental draft or duplicate run.
Checklist habits for team members
- Use the correct campus and template for the current shift or assignment.
- Continue an appropriate in-progress checklist rather than creating a duplicate.
- Mark only work that was performed or verified.
- Explain exceptions with concise, factual notes.
- Complete the checklist promptly so the next shift and leaders have an accurate record.
If you can read but cannot complete a checklist
Viewing and completion are separate access checks. Confirm the church and campus, then ask an administrator to review effective checklist-completion access. Reopen a run to check its saved responses before retrying a failed save or starting another run. Photos require a completed upload; selecting a photo is not proof it was saved.
Start the checklist for today's service on mobile
When your updated app and church support service-day checklists, open Home on iPhone or Dashboard on Android, confirm the campus, and find the Checklist section. It lists today's services even when you do not have a personal shift.
- Choose the correct service and select Start. A connection and the campus default template are required. Wait for the full checklist to open.
- Select Continue when that service already has a draft. The team shares one run for the service, including when two people try to start at the same time.
- Select View for a completed run or a record you can only read. Viewing does not grant permission to edit or reopen it.
If no default is configured, ask the campus lead to set one. If the service-day section is absent, your build or church may still use the earlier checklist card; open Checklists and follow the standard template workflow. Old history is not automatically assigned to today's service. Completing a checklist does not check you in to a shift.