Checklists
Manage Shift Checklists as an Administrator
Create and maintain campus checklist templates, monitor checklist activity, and safely remove draft or completed records.
Shift Checklists help church security leaders standardize recurring safety work and retain a campus-wide record of completed tasks. Administrators use templates to define the work, monitor in-progress checklist runs, review notes and photos, and remove drafts or completed records when policy permits.
A checklist template defines the reusable task list for a campus. A checklist run is the draft or completed record created when a team member starts that template.
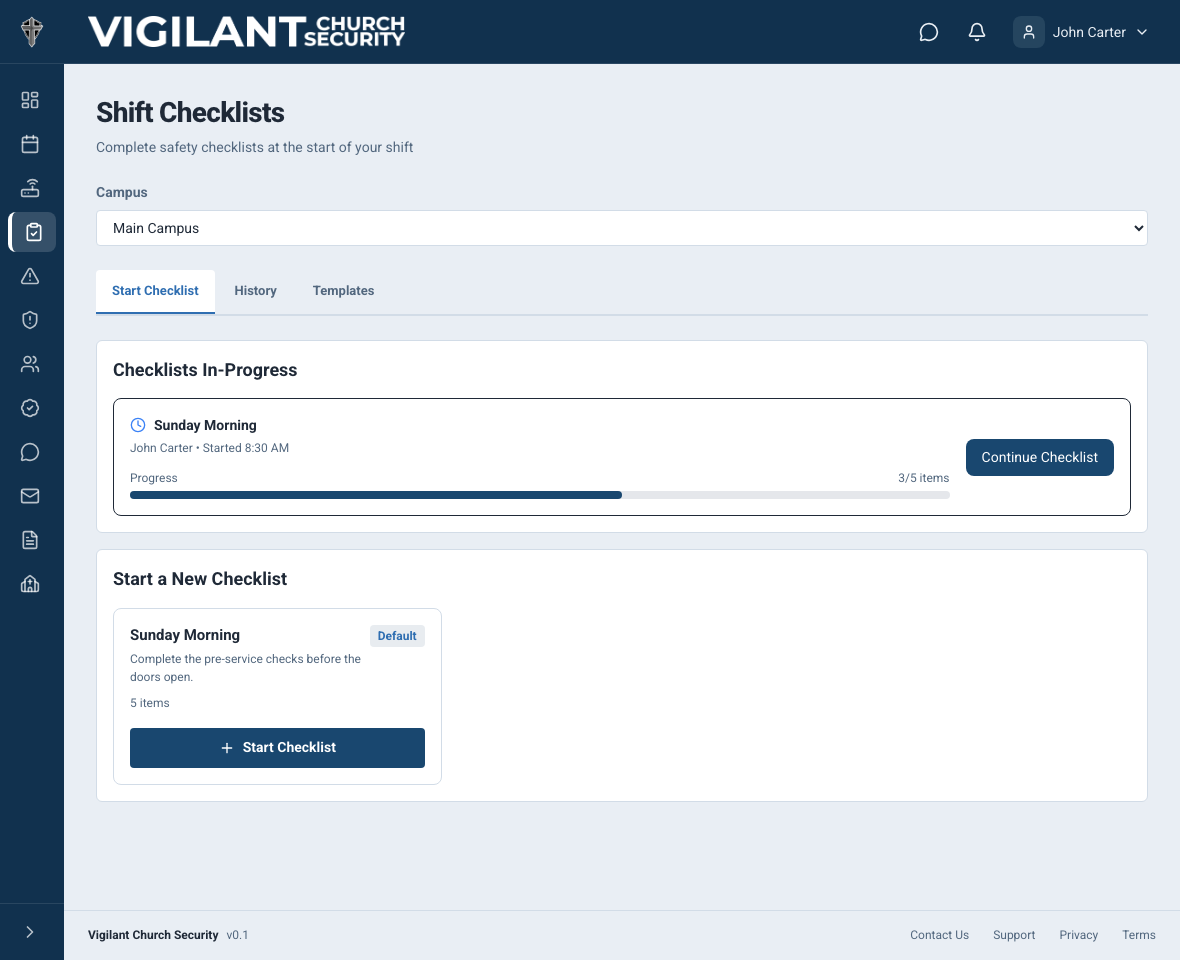
Review the Shift Checklists workspace
Select Checklists in the main navigation. If your church has multiple campuses, choose a specific campus to create templates or start a checklist. All Campuses provides a combined view, but a specific campus is required before starting or managing campus checklist work.
- Start Checklist shows same-day drafts in progress, available templates for the selected campus, and up to five recent completed checklists.
- History shows draft and completed checklist runs for the selected campus, including the team member, date, status, and completed-item count.
- Templates shows each campus template, its description, default designation, and item count.

Example shown with fictional demo data. View full-size screenshot.
Configure Checklist permissions
Open Church Admin, then Role Permissions, and review the Checklists group.
- View Checklists permits viewing available templates and campus records.
- Manage Checklists controls template management.
- Delete Checklists controls deletion of runs, subject to the additional leadership and campus restrictions.
Complete Checklists is a separate control in the role editor. It allows starting and editing runs, completing them and uploading photos, alongside the required viewing and campus access. View Checklists alone does not authorize those actions. Pastoral & Ministry Staff is read-only by default unless the appropriate operational permission is granted.
Administrators and directors can have organization-wide deletion access; campus leads remain limited to assigned campuses. Confirm the effective role, Church Admin access and campus before changing or deleting a record. Ask Support to review an unexpected restriction instead of enabling unrelated permissions.
Plan checklist templates
Create a separate template for each repeatable workflow, such as Opening, Closing, Parking Lot Setup, Children’s Wing Sweep, Medical Equipment Inspection, or Severe Weather Preparation. Keep each item short enough to scan during a shift.
- Use the template name to identify the event, shift, or operational purpose.
- Use the description to explain when the template should be used or who is responsible.
- Write each checklist item as one observable action or verification.
- Use the optional item description for supporting detail when creating the template, but keep the item name understandable on its own.
- Place items in the order the team should perform them.
- Avoid asking team members to record sensitive personal information in checklist notes or photos.
Create a checklist template
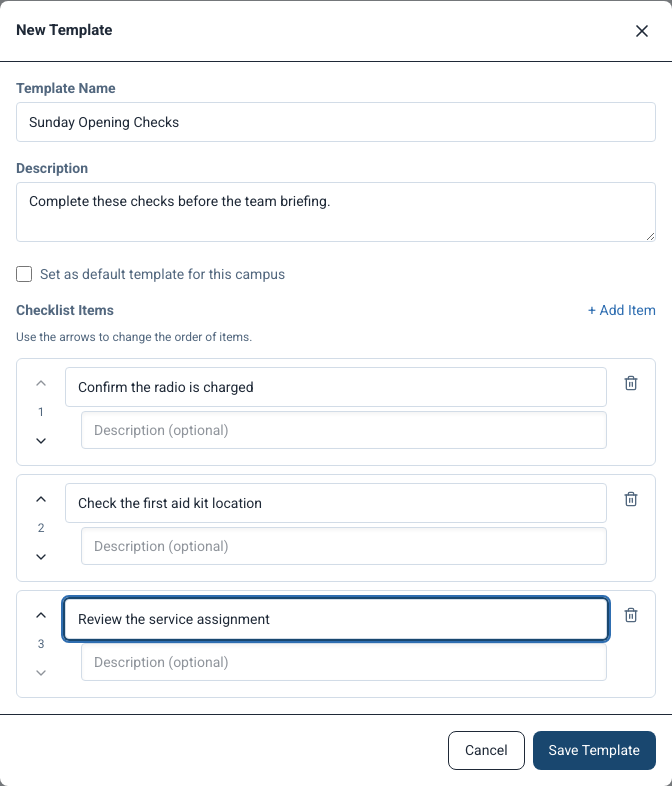
- Select Checklists, then choose the specific Campus that will use the template.
- Open the Templates tab and select New Template. The button is disabled while All Campuses is selected.
- Enter the Template Name. A name is required before the template can be saved.
- Add an optional Description explaining the checklist’s purpose or timing.
- Select Set as default template for this campus when the template should carry the Default label. Setting a new default removes the default designation from the previous campus template.
- Under Checklist Items, select Add Item for each step. Enter the item name and an optional description.
- Review the item order and remove blank or duplicate rows, then select Save Template.
Only rows with an item name are saved. A template can technically be saved without items, but team members will receive an empty checklist, so add and review the operational steps before rollout.

Example shown with fictional demo data. View full-size screenshot.
Edit a template or remove an item
- Select the campus, open Templates, and find the template.
- Select the pencil icon to open Edit Template.
- Update the name, description, default setting, or checklist items.
- To remove an item from future use, select the trash icon beside that item.
- Select Save Template and review the updated item count in the Templates list.
Review template changes with campus leaders before saving. Checklist runs already created from a template are operational records and should not be treated as substitutes for testing a revised template.
The current Templates tab provides controls to create and edit templates and to remove individual items. It does not provide a Delete Template button. If an entire obsolete template must be removed, stop using it and contact Vigilant Church Security support for assistance rather than deleting checklist history.
Monitor drafts and completed checklists
Same-day drafts appear under Checklists In-Progress for the selected campus. The card shows who started the checklist, its start time, and its item progress. Checklist drafts are visible campus-wide to people with View Checklists, so leaders should continue an existing operational draft instead of starting a duplicate.
Selecting Continue Checklist opens the saved draft. Item selections save as they are changed, notes save when the notes field loses focus, and an open draft also autosaves after approximately 30 seconds.
A team member can complete a checklist while some items remain unchecked. Use this only for intentionally skipped or inapplicable steps, and require a clear note explaining why. Selecting Complete makes the run final; completed item results and notes cannot be edited through the normal checklist workflow.
Photos can document conditions or completed work. Image uploads must be image files no larger than 10 MB. Apply your church’s privacy and evidence-handling rules, and never require someone to enter an unsafe location merely to obtain a checklist photo.
Review Checklist History
Open History to review campus checklist activity. A green check identifies a completed run and a clock identifies a draft. Select a row to review the checklist items, notes, and photos.
Use History to confirm that required checklists were completed, identify skipped items, review supporting notes or photos, and follow up with the recorded team member. The dashboard can also display the most recent checklist for quick awareness.
Delete a draft or completed checklist
Deleting a checklist run is permanent. Use it to remove an accidental duplicate, a test record, or another run that your approved records policy says should not be retained. Do not use deletion to hide an incomplete result or operational concern.
- Choose the correct campus and open Start Checklist or History.
- Select the trash icon beside the draft or completed run. The delete control appears only for authorized leaders.
- Read the confirmation carefully. Delete Checklist Draft removes saved progress and attached photos. Delete Completed Checklist removes its history, item results, notes, and attached photos.
- Select Delete Draft or Delete Checklist to confirm. The removed run cannot be restored.
Checklist administration practices
- Review templates with the people who perform the work before making them the campus standard.
- Use consistent names and item wording across campuses while preserving legitimate campus differences.
- Review same-day drafts so duplicate or abandoned checklist runs do not remain unresolved.
- Require notes for skipped, failed, or inapplicable checklist steps.
- Review photos and notes for operational follow-up without collecting unnecessary personal information.
- Restrict Delete Checklists and apply your church’s approved retention policy to completed records.
- Review Checklist permissions whenever a security leader changes campuses or responsibilities.
Set the default for service-day checklists
Updated native builds can show a checklist for each of today's campus services when the church's backend supplies service-day checklists. Start uses the campus default template. Set and review that default before the team uses the feature; without it, a new service checklist cannot be started.
Each service occurrence has one shared run. Multiple team members should continue that run rather than start separate copies. An existing run keeps its original template and service details if you later change the default. Older, unassociated checklist history is not automatically attached to a service.
The campus timezone determines today. Rows can remain visible after the service ends or the checklist is completed. This is independent of a member's personal shift and does not record attendance. The web Dashboard can still show Recent Checklist; use Checklists for the full workspace.