Incidents
Report and Follow Up on Incidents
Learn how security team members submit factual incident reports, add the right details, and follow an incident through review.
Use Incidents to document safety, security, medical, property, and service-related events for your church’s follow-up. This guide explains how to submit a clear report, review it afterward, and add useful follow-up information.
If there is an active threat, a medical emergency, or immediate danger, contact 911 or your local emergency services and follow your church emergency procedures first. Report the incident in Vigilant Church Security only when you are safe.
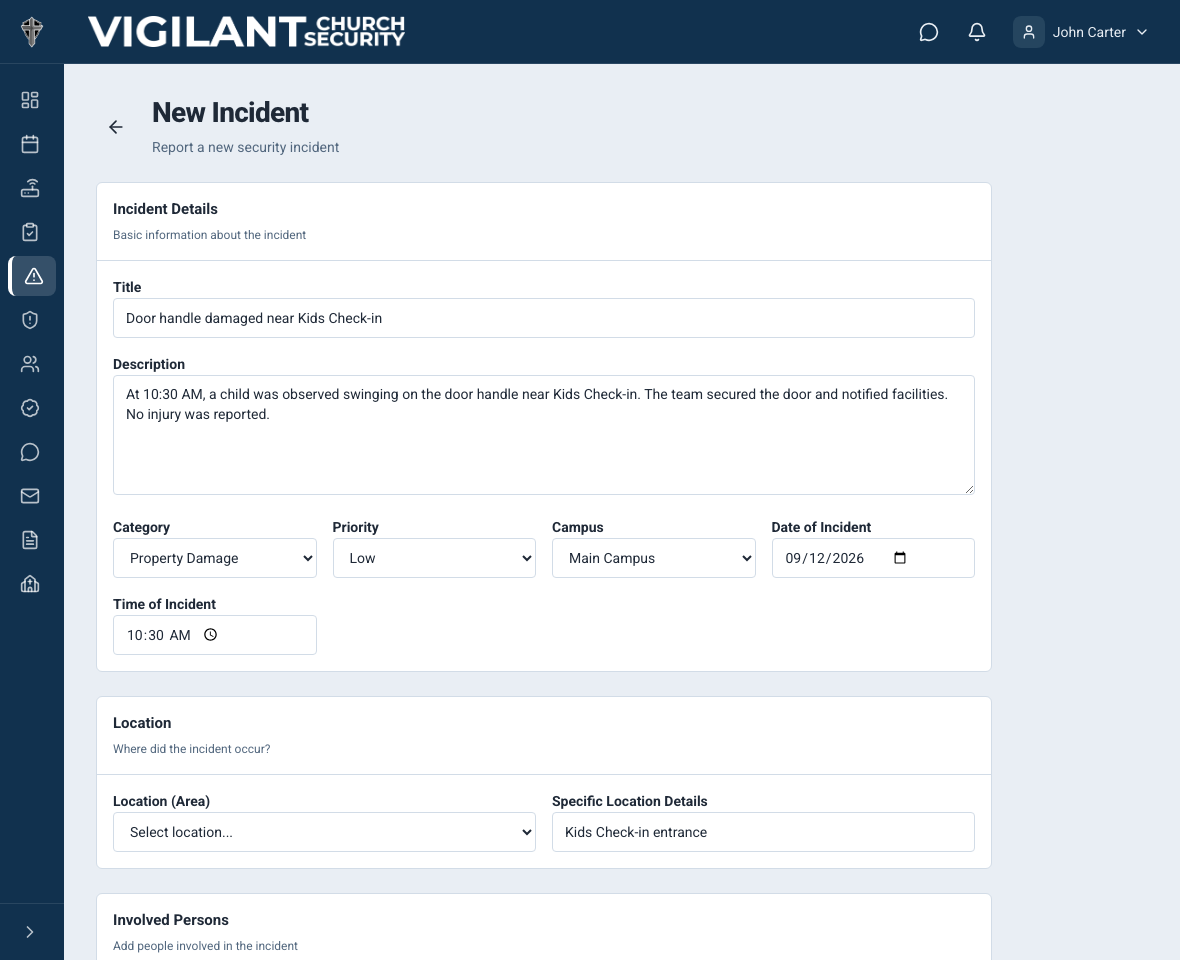
Create an incident report
- Select Incidents in the main navigation, then select New Incident. If New Incident is unavailable, ask a church administrator to confirm that your role has Create Incidents permission.
- Enter a short, specific Title that identifies the event. Then use Description to record what happened in chronological order.
- Choose the Category and Priority that match your church’s reporting policy. The available priorities are Critical, High, Medium, and Low.
- Confirm the Campus, Date, and Time. Select the campus Area and enter a Specific Location when that information will help another team member find or understand the scene.
- Add involved people when needed, using their name, relevant contact details, role in the incident and a factual description. Current web choices include Injured Person, Patient, Affected Person, Victim, Witness, Reporter, Person of Concern, Perpetrator, Child / Dependent, Parent / Guardian, Responder, Driver, Property Owner and Other. Choose a neutral, accurate role; older native builds may show fewer options.
- Add agreed-upon Tags and select the Injury Sustained, Trespassed, or Authorities Contacted flags when they apply.
- Enter the reporter’s name and phone number. You may leave the reporter name blank to use the name on your account.
- Select relevant photos if the form and your role allow them. Do not delay an urgent report to collect photos. Never photograph an unsafe scene or include unnecessary private information.
- Review the report, then select Create Incident. The new report begins with a status of New and opens as an incident record.
Title, Description, Campus, and Date are required. The form defaults the date and time to the current values, but you should correct them when reporting an earlier event. The location, people, flags, reporter phone, tags, and photos provide useful context when they are relevant.

Example shown with fictional demo data. View full-size screenshot.
Choose the right category and priority
Categories include Custody Issue, Disruption, Injury, Medical, Parking Lot, Property Damage, Security, Service Disruption, Theft, Threat, Vandalism, Weather, and Other. Choose the category that best describes the main event rather than every possible effect of it.
Your church should define what Critical, High, Medium, and Low mean in its security procedures. Follow that definition and the church’s escalation process. Selecting a priority in the app does not replace calling emergency services or directly notifying an on-duty leader.
Write a clear, factual description
- Start with what happened, where it happened, and when it happened.
- Record events in the order they occurred and use specific, plain language.
- Separate what you personally observed from what another person told you. Identify direct statements as statements rather than established facts.
- Include relevant actions taken by the security team, church staff, medical responders, or law enforcement.
- Avoid guesses about intent, diagnoses, blame, or conclusions that you cannot verify.
- Include only personal, medical, or contact information needed for the report and your church’s follow-up.
Example: “At 10:18 a.m. in the west lobby, I observed a guest fall near the entrance. I asked the guest whether medical assistance was needed. The guest stated that their right ankle hurt. The shift lead contacted EMS at 10:21 a.m.”
Use involved people, photos, and flags
Add an involved-person entry when it will help follow-up. Use the most accurate role and distinguish observations from allegations. A person needing medical help can be recorded as Patient or Injured Person without labeling anyone a perpetrator. Use notes for observable details or a relevant statement.
Photos can preserve relevant visual evidence, but personal safety and dignity come first. If your role does not allow photo upload or editing, submit the incident without delaying and ask a security lead to add an authorized photo later. Each uploaded image must be an image file no larger than 10 MB.
Select Injury Sustained, Trespassed, or Authorities Contacted only when the condition is known to apply. These flags help leaders scan and filter incident records.
Review the report and add follow-up
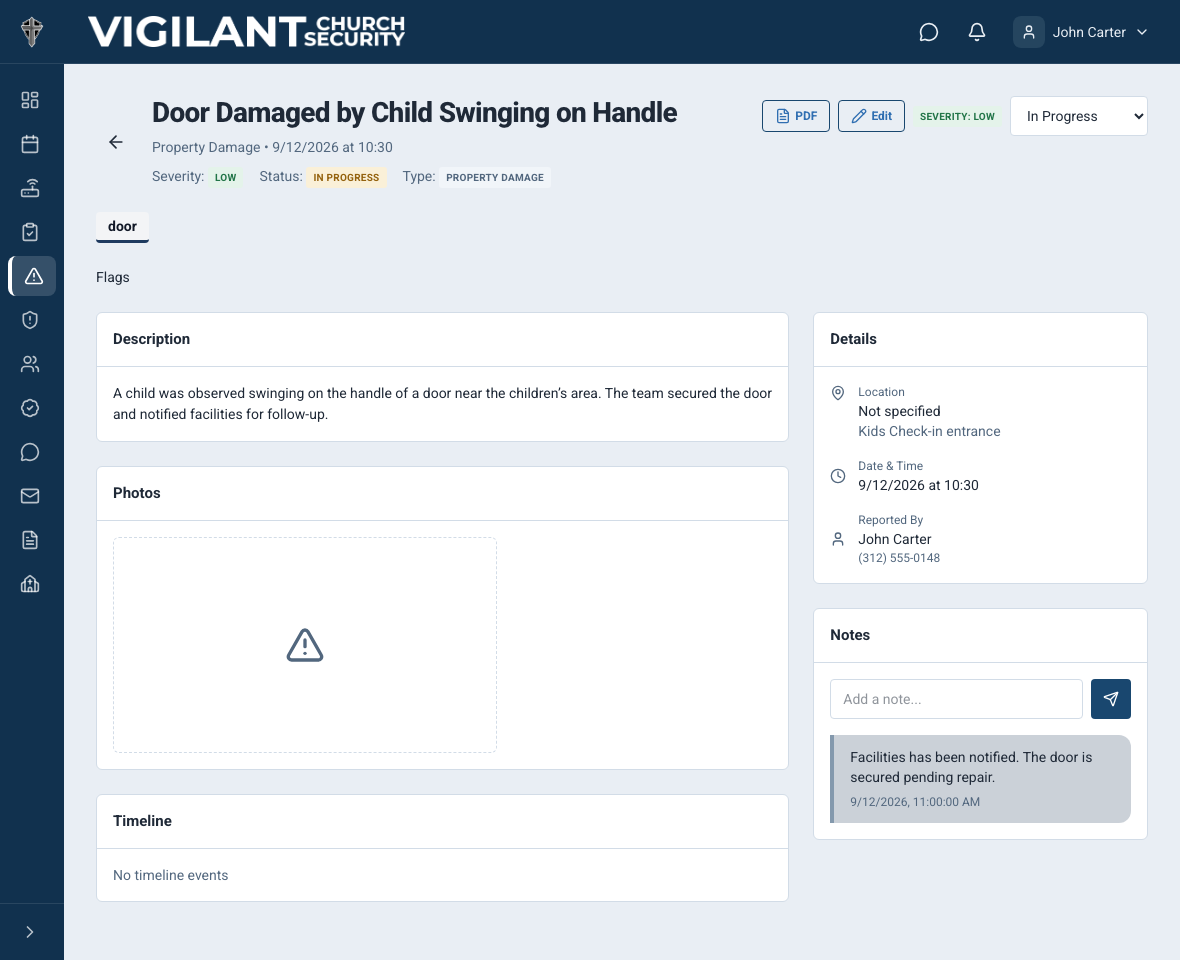
Open an incident to review its description, people, photos, timeline, location, reporter details, and notes. The status shows whether the report is New, Acknowledged, In Progress, Resolved, or Closed.
Use Notes to add later information such as a witness follow-up, a case number, or an action completed by a leader. A note supplements the original report and creates a timeline entry. If the original report contains an error, ask a user with Edit Incidents permission to correct it.
Editing the report, changing status, adding or removing photos, archiving, and deleting depend on your assigned role permissions. If a change is unavailable or rejected, do not create a duplicate incident; contact a security leader or church administrator.

Example shown with fictional demo data. View full-size screenshot.
Find an existing incident
On the Incidents overview, search by title or description and review campus, priority, status and date filters. Select Clear to reset filters. Eligible leaders can use Show Archived; ordinary team roles cannot view archived records, including through an old link.
If you cannot find a report
- Clear the search and filters, then confirm that you selected the correct campus and date range.
- Ask an eligible leader whether the incident was archived. Show Archived is limited to leadership access and does not grant general team access to those records.
- Ask an administrator whether your role has View All Incidents permission.
- A report marked Sensitive is completely hidden from users without View Sensitive Incidents permission.
Sensitive reports may not generate the usual organization-wide incident notifications. Always follow your church’s direct escalation procedure when leaders need to be contacted immediately.
Protect the incident record
- Do not share incident details, screenshots, photos, or exported PDFs outside the people authorized by church policy.
- Do not enter passwords, access codes, financial account numbers, or unrelated private information in a report.
- Use the report, timeline, and notes as an accurate operational record; never alter information to hide an error or change the meaning of an event.
- Ask a security leader when you are unsure whether information belongs in the incident record.
Review photos and export a PDF
Open a report photo to inspect it and confirm it belongs to the intended incident. On the web detail page, select PDF and review the generated report. On iPhone or Android builds with incident export, use the available Save or Share PDF action; otherwise use the web detail page. Export requires access to the incident. Restore connectivity and reopen the record if generation fails.
An alert about an incident is not proof that every team member can read it. Sensitive-record permissions and campus access still apply when opening a notification or sharing a report.