Incidents
Manage Incidents as a Church Administrator
Configure incident access, establish reporting standards, review sensitive reports, and manage the incident lifecycle across your church.
Incidents gives church security leaders one place to review, manage, and retain reports submitted by the security team. Administrators are responsible for deciding who can see reports, setting consistent reporting standards, and making sure each incident is followed through the appropriate review process.
If an incident involves an active threat, a medical emergency, or immediate danger, contact 911 or your local emergency services and follow your church emergency procedures first. Create the report only when it is safe to do so.
Open and review the Incidents workspace
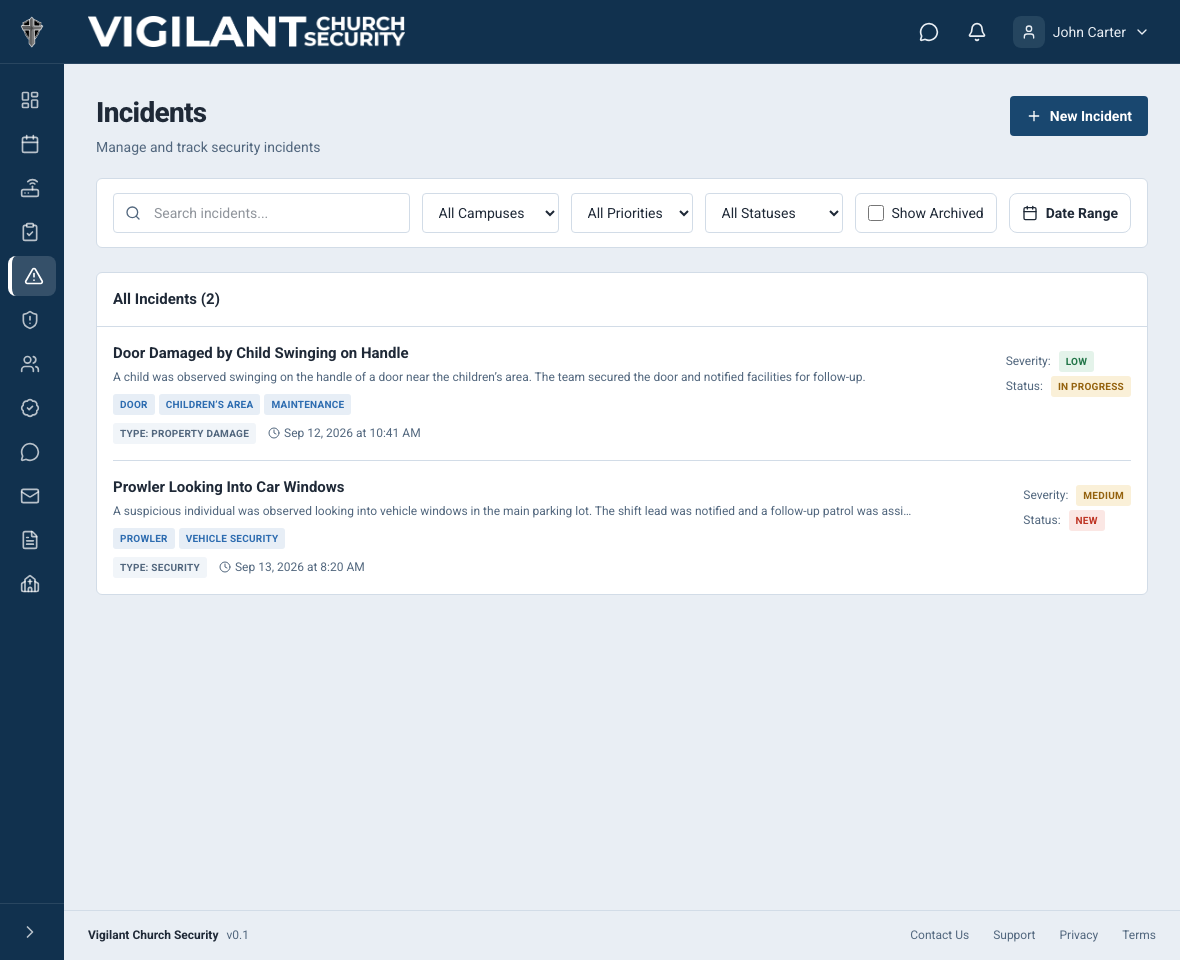
Select Incidents in the main navigation. The overview is the administrative queue for reports from every campus the signed-in administrator is authorized to view.
Use the search field to find words in an incident title or description. If your church has more than one campus, use the campus selector to narrow the list. You can also filter by priority, status, date range, or select Show Archived to include archived records. Select Clear to remove all active filters.
Incident cards summarize the report type, priority, status, severity, creation time, and operational flags such as Sensitive, Archived, Injury, Trespassed, or Authorities Contacted. Open a card to review the full record.

Example shown with fictional demo data. View full-size screenshot.
Configure incident permissions
Open Church Admin, then Role Permissions, and review the Incidents permission group before inviting the wider team. A church can override the default access for a role, so verify the effective permissions for your own organization rather than relying only on a role title.
- Create Incidents — allows a person to submit a new incident report.
- Edit Incidents — allows changes to report details, status, people, tags, and photos.
- Delete Incidents — allows permanent deletion of an incident and its associated records.
- Archive Incidents — allows an incident to be archived or restored.
- View All Incidents — allows access to the Incidents list and incident detail pages.
- View Sensitive Incidents — allows access to reports marked Sensitive.
Access depends on effective incident permissions, Church Admin access, campus scope and church-specific overrides. Pastoral & Ministry Staff may have incident-management capabilities when enabled for their church; do not assume every pastoral account is either read-only or authorized to manage reports. Check the actual account and the requested action before changing access.
Reserve Delete Incidents, Archive Incidents, and View Sensitive Incidents for the smallest group that needs them. In the current incident form, only Administrators and Directors of Safety & Security can mark or unmark a report as Sensitive.
Set reporting standards for your church
Before rollout, tell the team how your church uses categories, priorities, statuses, tags, and campus locations. Consistent choices make filtering and trend review much more useful.
Categories
The incident form includes Custody Issue, Disruption, Injury, Medical, Parking Lot, Property Damage, Security, Service Disruption, Theft, Threat, Vandalism, Weather, and Other. Define when your team should use each category and when Other is appropriate.
Priorities
The available priorities are Critical, High, Medium, and Low. The platform does not replace your escalation policy, so document what each level means for your church. For example, your policy might reserve Critical for an immediate life-safety event and High for an urgent incident that needs leadership attention. Train team members to follow the policy, not guess from the label.
Statuses
The status choices are New, Acknowledged, In Progress, Resolved, and Closed. A practical workflow is to acknowledge a new report after a leader reviews it, move it to In Progress while follow-up is underway, use Resolved when the operational response is complete, and close it after documentation and leadership review are complete.
Locations and tags
Keep campus names and campus areas current so reports can be assigned to the correct location. Agree on a small, reusable set of tags for recurring needs such as parking, children’s ministry, first aid, or law-enforcement follow-up. Avoid creating several tags that mean the same thing.
Review a new incident
- Open the report from the Incidents overview and confirm the campus, date, time, location, category, and priority.
- Read the description for an objective sequence of events. Confirm that observations are separated from statements made by witnesses or involved people.
- Review the involved people, reporter details, photos, tags, and the Injury Sustained, Trespassed, and Authorities Contacted flags.
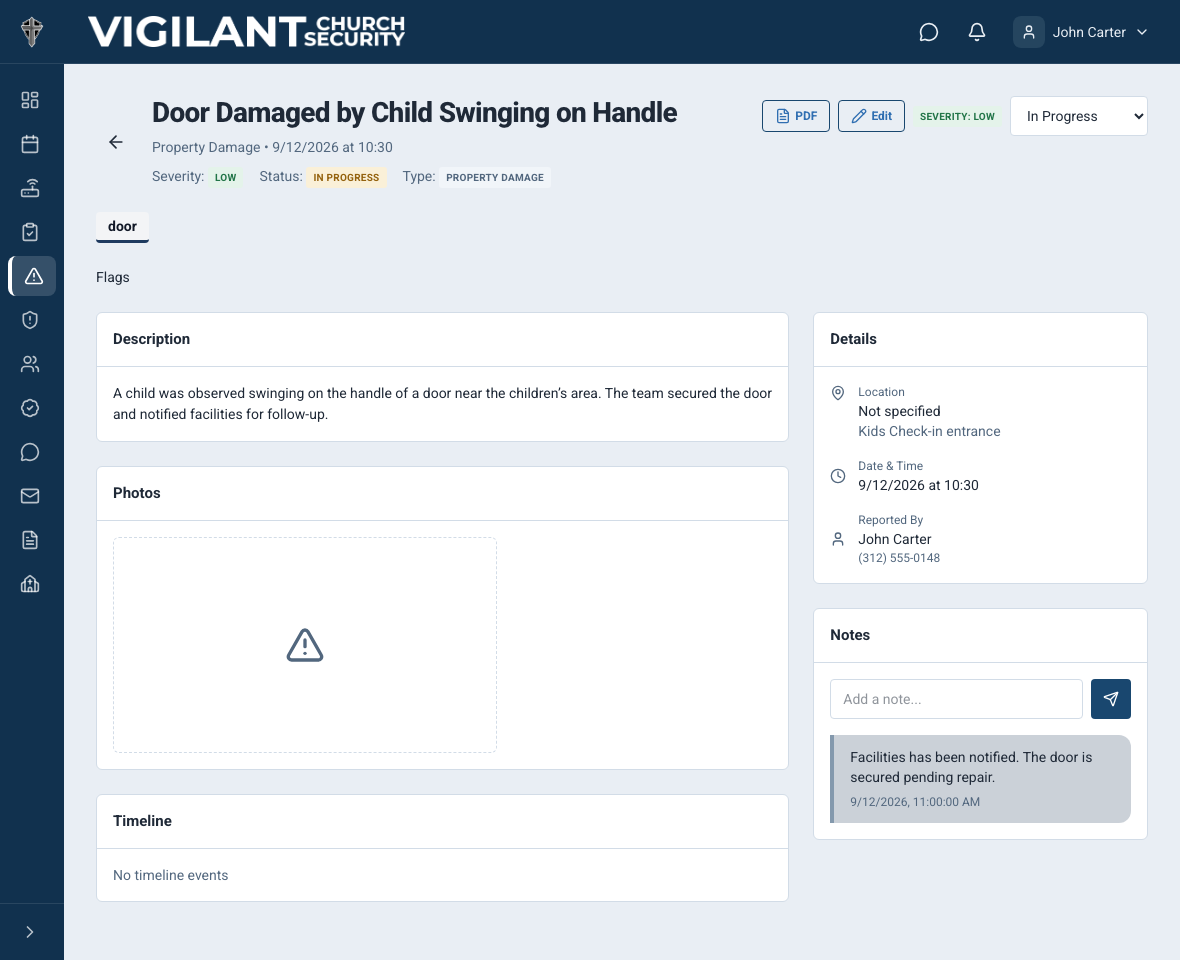
- Use the timeline to understand when the incident was created and what changes have been made.
- Add a note for follow-up information that should supplement the original report. Edit the original details only when a correction is needed and your role has Edit Incidents permission.
- Update the status as the response progresses. If a control is unavailable or a change is rejected, verify the signed-in user’s role permissions.
The detail page brings the original report, involved people, photos, timeline, location, reporter details, and notes together. Users with the appropriate permissions can edit the report, change its status, archive or restore it, or delete it. Viewers can generate a PDF record.

Example shown with fictional demo data. View full-size screenshot.
Handle sensitive incidents carefully
Use Sensitive only when a report requires restricted visibility. A sensitive incident is hidden from anyone who does not have View Sensitive Incidents, even if that person can view other incidents. Creating a sensitive incident also skips the organization-wide new-incident notification and push-notification process.
Because fewer people will see a sensitive report and automated incident notifications are not sent, follow your church’s separate escalation process to alert the specific leaders who need to respond. Record only information that is necessary for the safety and operational purpose of the report.
Export, archive, restore, or delete a report
Generate a PDF
Select PDF on the incident detail page to generate a portable record. The PDF includes the church and incident details, involved people, attached photos, and the incident timeline. Store or share the PDF according to your church’s privacy, legal, insurance, and records-retention requirements.
Archive and restore
Archive a report when it should leave the ordinary active list but remain in history. Archived incidents are visible only to eligible Church Admins, Directors of Safety and Security, Campus Security Leads and Pastoral & Ministry Staff, within their existing campus and sensitive-record access. Eligible leaders can select Show Archived, open the report and use Restore. Archive and Restore also require the archive grant; enabling that grant for an ineligible role does not expose archived records.
Delete permanently
Delete removes the incident permanently along with its notes, photos, tags, involved people, and timeline. This action cannot be undone. Use it only when your church’s policy requires permanent removal and the administrator has confirmed that no record must be retained.
Ongoing administrator practices
- Review incident role permissions whenever a leader changes roles or leaves the security team.
- Document escalation rules for Critical, High, sensitive, medical, and law-enforcement-related incidents.
- Review New, Acknowledged, and In Progress reports regularly so follow-up does not stall.
- Audit category, priority, location, tag, and status usage for consistency across campuses.
- Apply your church’s approved retention, privacy, and disclosure policies before exporting, archiving, or deleting records.
- Test the workflow with each security role so leaders understand what their team members can submit, view, and change.
Mobile and notification checks
On iPhone or Android builds that offer incident export, use the available Save or Share PDF action; otherwise use the web detail page. Notifications do not grant access to a sensitive or archived report. Confirm a failed change on the saved record before retrying.
Review involved-person roles
The web incident form now includes Injured Person, Patient, Affected Person, Person of Concern, Child / Dependent, Parent / Guardian, Responder, Driver and Property Owner alongside Victim, Witness, Reporter, Perpetrator and Other. Use the role supported by the known facts. An older mobile form may expose a smaller list; use the web editor when the needed role is absent.